
Homebrew Log: Brooklyn Brew Shop Chocolate Maple Porter
Homebrewing isn’t a hobby to which I’ve fully committed, but it is something I’d like to do on a more serious level. I’ve brewed a few batches now and each time I was a nervous wreck, which is probably why I didn’t brew much. Every other book and article I’ve read on the subject made me feel like everything needed to be done exactly right or else; until I got “The Complete Joy of Homebrewing” by Charlie Papazian. No, this isn’t a book review but, the first thing he says is, “Relax. Don’t worry. Have a homebrew,” and that statement changed everything. This latest batch I brewed went so much more smoothly and with less stress because of those three sentences. It reminded me that the reason I homebrew is because it’s fun and it helps me relax. So, that’s what I did; I relaxed and brewed the beer without stressing if my equipment was sanitized enough, or if my mash temperature wasn’t exactly where it was supposed to be. As it turns out, all was well.

 right around time to start sparging. I set a pretty good sized strainer over my stock pot (yes, you can use a stock pot) and scoop the grains into the strainer to begin collecting the wort. Then, I pour a ladle full of hot water over the grains at a time to wash the sugars and create more wort for boiling. Normally, I’ll use the ladle until there’s a manageable amount of water left that I can just pour over the grains. I like to let the grains sit for a few minutes to finish draining and in the meantime I prepare the hops. This kit came with one packet of hops (unknown variety) and i divided those into two additions. The first addition uses ¾ of the packet and the rest goes in the second addition. One note that I’d like to make is that I do not squeeze the grains, or in this case, mash them with the spatula. Some people recommend you do this, but in my experience you risk creating off-flavors with tannins forced from the grains.
 Once the mash is over it’s time to start the boil. Put your stove on high and watch the foam collect on top. When that separates and the wort starts to roll, that’s called the hot break. Add your first addition of hops and set the timer for 60 minutes. At this point it becomes a matter of “hurry up and wait” so, while you’re waiting, this is a good time to do a bit of dish cleanup and/or enjoy a homebrew. Since I didn’t have any homebrew on hand, I had myself a tasty wheat beer called Sandbar Sunday from Islamorada Brewing Co. out of the Florida Keys. 45 minutes into the boil, it’s time to add the last of the provided hops. This is also a good time to boil a few ounces of water to re-hydrate the yeast and fill your sink with ice water. When the water comes to a boil, take it off the heat and pour it into a glass measuring cup. At the very end of the wort boil I add ¾ cup of maple syrup and cut the heat. I place the pot in the ice bath, cover it and get the wort cooled down to 70 F (should take 15-20 minutes).

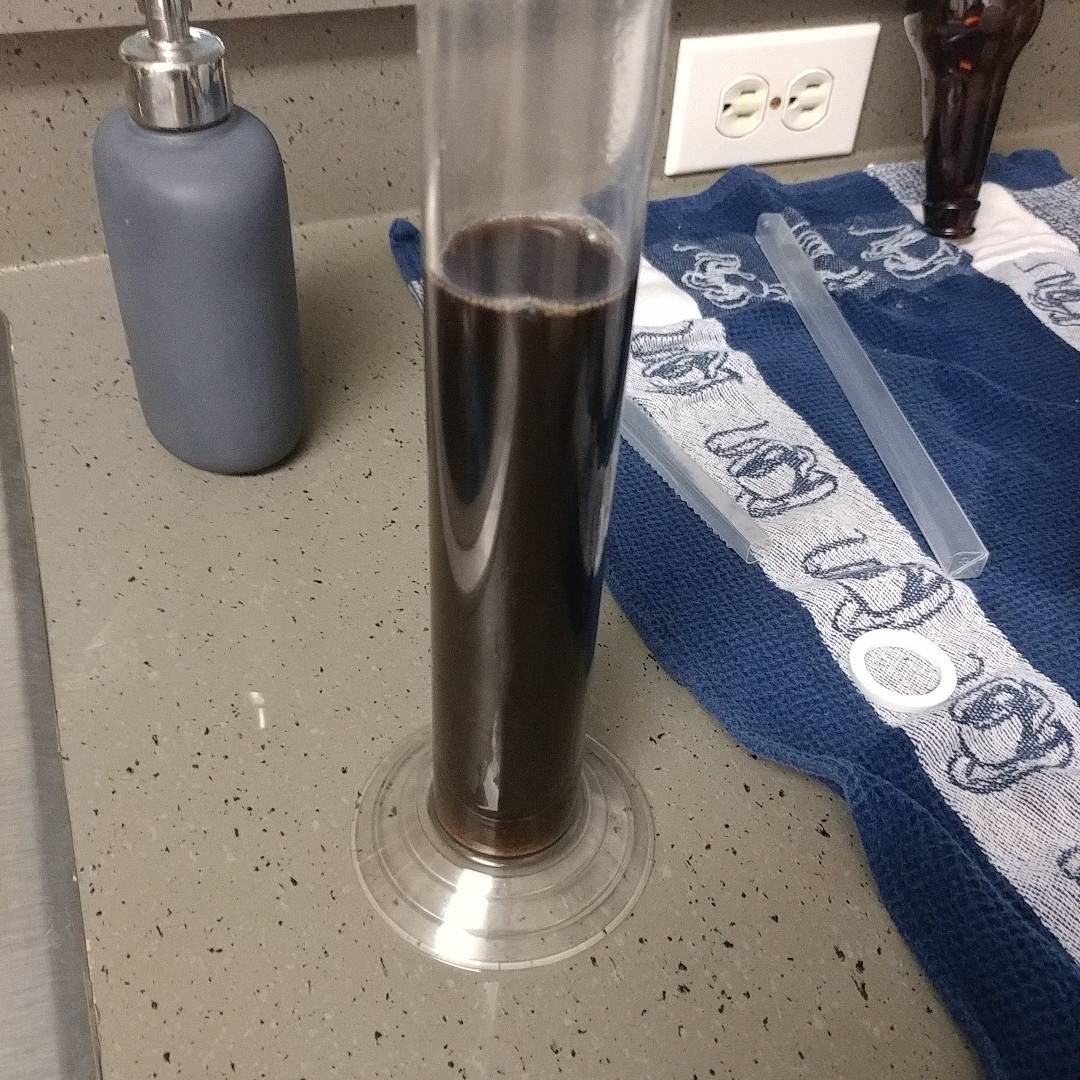
 Just about the time I add the syrup in the boil, my yeast water should have cooled down to about 70 F. At this time I sprinkle the yeast in the water and let it sit for 15 minutes. Then I gently stir it and let it sit for about 5 more minutes. By this time, the wort should be cool enough to move it to the fermenter. Because the Brewdemon has a smaller opening, I use my auto-siphon to transfer the wort from the pot to the fermenter. Once the beer is in I pour in the hydrated yeast and shake it all up to get some oxygen in the liquid. I add some sanitizer liquid to the airlock and put it on the fermenter. That’s it! Beer is brewed and now the waiting begins. To get the original gravity (OG) reading, the Brewdemon has a valve I can open and fill my test flask with wort. I used my hydrometer and got a reading of 1.053. I should note that pouring your sample back into the fermenter is a bad idea and can risk infection. Instead, drink it to get an idea of how your beer may taste once it’s fermented. This particular batch was really sweet and next time I would use a half cup of syrup rather than ¾. Once I bottle the beer and let it condition, I’ll write a follow up and give my full review of the kit.
 So, who is this kit for? If you are brand new to homebrewing and couldn’t care less about the ins and outs of homebrewing, you just want to make some beer then, this kit is for you. If you have been homebrewing extract kits and want to take the first steps to all-grain brewing then, this kit is for you. If you are bored on a Sunday afternoon and need to kill a few hours then, this kit is for you. Recipe kits from Brooklyn Brew Shop are fairly inexpensive at $15 and super easy to brew; almost fool-proof. Full equipment plus recipe kits run just $40! I just wish they included the ingredients so that more experienced homebrewers could scale the recipes up to 2.5 and 5 gallon batches.
My wife bought me a Brewdemon Conical Fermenter for Christmas last year and I’ve been eagerly waiting for the right time to try it out. The fermenter holds 2.5 gallons of beer but for this first run I used a one gallon chocolate maple porter kit from Brooklyn Brew Shop; also given to me by the missus. Like any other kit, they give you hops, yeast, and all the grains you’ll need (these are all-grain kits). The instructions, however, are only available online; something they don’t exactly tell you upfront. The instructions are written well enough and focus more on the first-timer so, these are perfect kits for absolute beginners. I do wish they would a grain bill, listed the hop variety with specs, and yeast strain; that would be a great educational opportunity. I’ll give my pros and cons about these kits a bit later, but for now, let’s get brewing.
I’m not going to give you the full how-to brew post, but I will give you a basic rundown of the process I went through. First thing I always do is sanitize; I use an ounce of Star-San in five gallons of water and soak all my tools for 2-3 minutes. I also spray down the counter tops with sanitizer for good measure. My list is pretty simple on brew day:
Thermometer
Hydrometer
Airlock
Auto-siphon/tubing
Test flask
Fermenter
Thermometer
Hydrometer
Airlock
Auto-siphon/tubing
Test flask
Fermenter

After I have everything cleaned and set aside, it’s time to begin. I start with the mash. I bring a half gallon of water up to about 170 F, take the pot off the heat, and pour in the grain making sure to stir constantly to prevent clumps. This brings the temperature down to about 140 F. This particular recipe calls for a mash temp between 144 and 152 F and I stayed within that ballpark. If the mash goes over, add some cool water. If the mash goes under, turn on the heat and bring it back up and turn the heat off. I find that if I keep my stove between low and 3, it does a pretty good job at staying on target. I make sure to stir the mash every ten minutes or so for one hour and take a temperature reading from different areas in my mash pot.
At about 30 minutes into the mash I bring one gallon of water up to 170 F so it’ll reach temperature

 Once the mash is over it’s time to start the boil. Put your stove on high and watch the foam collect on top. When that separates and the wort starts to roll, that’s called the hot break. Add your first addition of hops and set the timer for 60 minutes. At this point it becomes a matter of “hurry up and wait” so, while you’re waiting, this is a good time to do a bit of dish cleanup and/or enjoy a homebrew. Since I didn’t have any homebrew on hand, I had myself a tasty wheat beer called Sandbar Sunday from Islamorada Brewing Co. out of the Florida Keys. 45 minutes into the boil, it’s time to add the last of the provided hops. This is also a good time to boil a few ounces of water to re-hydrate the yeast and fill your sink with ice water. When the water comes to a boil, take it off the heat and pour it into a glass measuring cup. At the very end of the wort boil I add ¾ cup of maple syrup and cut the heat. I place the pot in the ice bath, cover it and get the wort cooled down to 70 F (should take 15-20 minutes).
 Just about the time I add the syrup in the boil, my yeast water should have cooled down to about 70 F. At this time I sprinkle the yeast in the water and let it sit for 15 minutes. Then I gently stir it and let it sit for about 5 more minutes. By this time, the wort should be cool enough to move it to the fermenter. Because the Brewdemon has a smaller opening, I use my auto-siphon to transfer the wort from the pot to the fermenter. Once the beer is in I pour in the hydrated yeast and shake it all up to get some oxygen in the liquid. I add some sanitizer liquid to the airlock and put it on the fermenter. That’s it! Beer is brewed and now the waiting begins. To get the original gravity (OG) reading, the Brewdemon has a valve I can open and fill my test flask with wort. I used my hydrometer and got a reading of 1.053. I should note that pouring your sample back into the fermenter is a bad idea and can risk infection. Instead, drink it to get an idea of how your beer may taste once it’s fermented. This particular batch was really sweet and next time I would use a half cup of syrup rather than ¾. Once I bottle the beer and let it condition, I’ll write a follow up and give my full review of the kit.
 So, who is this kit for? If you are brand new to homebrewing and couldn’t care less about the ins and outs of homebrewing, you just want to make some beer then, this kit is for you. If you have been homebrewing extract kits and want to take the first steps to all-grain brewing then, this kit is for you. If you are bored on a Sunday afternoon and need to kill a few hours then, this kit is for you. Recipe kits from Brooklyn Brew Shop are fairly inexpensive at $15 and super easy to brew; almost fool-proof. Full equipment plus recipe kits run just $40! I just wish they included the ingredients so that more experienced homebrewers could scale the recipes up to 2.5 and 5 gallon batches.
*Disclaimer: this is not a paid endorsement by Brooklyn Brew Shop nor did they ask me to write this review.

Comments
Post a Comment